How to make a network cable yourself. How to properly crimp an Internet cable at home
If suddenly the question arises about organizing a home network or simply connecting a computer to a router, modem or other device, but there is no way to call a specialist, do not be upset. In computer stores you can freely buy ready-made cables (patch cords) with various types of connectors already connected. If there is no such store nearby, or you need to lay the cable in places where the connectors will not fit, you will have to crimp the cable yourself.
To do this, you will need basic knowledge in the field of electronics, as well as a certain type of cable, connectors, crimping tools, tester, screwdriver and knife. But before we begin installation, let’s try to figure out what is intended for what, how it works, and how to crimp it yourself.
Cable
In standard local networks, it is customary to use a conductor called “twisted pair”. It owes its name to its internal structure, consisting of two, four or eight insulated copper or aluminum conductors, intertwined in pairs and enclosed in an external polyvinyl chloride insulation. The shell of each wire is made in different colors for ease of connection. There are two types such as surrounding foil layer (FTP) and unshielded (UTP).

It is not advisable to use an FTP conductor to set up a home network, since the screen is designed to protect against strong electromagnetic interference, as well as for a working cable length of more than 100 meters. So a cheaper and more common option in the form of a UTP cable, sold in any computer store or market, is quite suitable. Any “twisted pair” is divided into several categories depending on the number of cores, throughput and purpose. The cable is marked with a combination of letters and numbers: from CAT-1 to CAT-7. The most common conductor for local network equipment is CAT-5 or its modification CAT5e. It consists of four pairs of multi-colored wires and provides up to 100 Mbit/s at a frequency of 100 MHz.
Connectors
All modern computer equipment intended for widespread use for network connections has standard standard plug connectors marked 8P8C. Sometimes for some reason this connector is called RJ-45. But no matter what they are called, they have one purpose - to connect a “twisted pair” to some device. These plugs, like the cable, may or may not be shielded. The connector is a plastic head with eight grooves cut into it for laying conductor cores. At the end of these slots there are movable contacts that clamp the wires. During installation, the numbering of the grooves is very important. If the connector is positioned with the contacts up and the latch towards you, then the first contact will be on the left, and the eighth contact will be on the right.
There are two known options for the arrangement of twisted pair cores in connectors:

- EIA/TIA-568A.
- EIA/TIA-568B.
The first provides the following sequence (from left to right):
- White-green.
- Green.
- White-orange.
- Blue.
- White and blue.
- Orange.
- White-brown.
- Brown.
In the second diagram, the wires are arranged like this:
- White-orange.
- Orange.
- White-green.
- Blue.
- White and blue.
- Green.
- White-brown.
- Brown.
Connection types

Option EIA/TIA-568A is used to crimp a network cable, which will be connected at one end to the computer and the other to one of the switching devices (router, switch, modem, etc.). This type of connection is called direct. But there is another one - cross or cross. It is used to connect two computers directly. Direct crimping of a network cable involves securing connectors according to the EIA/TIA-568A scheme at both ends. This is the most common type of connection, since local networks usually use more than two computers connected via a switch or other types of switches. If there is still a need to connect two machines, then a cross connection is used. In order to crimp a computer-to-computer network cable, one end of the cable should be connected to a connector using EIA/TIA-568A technology, and the other - using EIA/TIA-568B. For a direct connection, you can use not all 8 cores, but only 4, but this will reduce the number by 10 times. When cross-connecting, all 8 cores are used.
Cable preparation
Before crimping, the conductor should be stripped of insulation. You can cut the cable with a regular knife, but the performance of our patch cord and the quality of data transmission will depend on how carefully this is done. The outer insulation is cut at a distance of 20-25 mm from the end. It is important not to damage the insulation of the cores, which may subsequently lead to their short circuit. After the insulation has been removed, it is necessary to unwind all pairs and straighten them in the order EIA/TIA-568A or EIA/TIA-568B, depending on the required type of connection.
How to crimp a network cable with a crimper

Craftsmen use special pliers (crimper). If you don’t find such a tool at home, you can buy it at any store that sells radio components. The cost of the simplest crimper is about 200 rubles. Before crimping the network cable, you need to make sure that the wires do not intersect each other.
Next, insert them into the grooves of the connector until they stop and fix them. You should visually make sure that all the wires rest against the front wall of the plug head, none of them accidentally fell into the “strange track”, and that the crimping pattern is not broken. After this, the connector is placed in a special working socket of the crimper, made in the shape and size of the connector, and is clamped until it stops. The same operation is performed with the other end of the future patch cord. You can check the correctness of the connection with a LAN tester, or, if you don’t have one, simply by connecting the computer to the desired device via a crimped network cable.
Cable crimping without crimper

If you still can’t find special pliers, and you can’t buy them, there is an option to crimp the network cable manually. Good eyesight and a thin screwdriver or knife will come in handy here. Having stripped the “twisted pair” of outer insulation and arranged its strands in the required order, we place them in the connector and again fix them with our fingers. The plug should be with the contacts facing up.
With the lower part of the connector resting on a table or other horizontal surface, you need to use a screwdriver or knife to move them one at a time until they stop. In this case, the teeth of the contacts will cut the insulation of the wires and secure them in the lower position. When buying connectors and planning to crimp them manually, it is better to take a few extra, because it may not work the first time, and you will have to run to the store again.
Common Mistakes
When crimping a cable, situations often arise when everything seems to be done correctly, but there is no connection. In this case, you should check the wire layout and double-check it for compliance with the type of connection.
If everything is correct, you need to make sure that all wiring is securely connected to the connector contacts. It is also possible that the top insulation is too cut, and the strands of the patch cord, twisting, can short out or, conversely, move away from the contact. In such cases, the cable should be cut and crimped again.
Good day, dear readers! Today we will talk about the network cable (patch cord), thanks to which most of you gain access to the Internet. That is, we'll talk about that how to crimp an RJ-45 cable.
I think it’s no secret that the cable does not appear in a ready-crimped state (otherwise it would not be possible to insert it everywhere, and there would be extra “tails”), but in the form of just a “lace” without any connectors.
Only then, after the efforts of some mythical installers, a sort of plastic pin appears on the cable, which can be plugged into the network card.
Probably, as you already guessed, this article will talk about how to crimp a network cable, what is needed for this and what all this is used for.
The process of crimping a network cable is not difficult, although it requires sleight of hand and some skill.
Let's get started.
What tools and items will be needed
How to crimp a cable? Yes, it’s very simple, but first we need to understand what we need. And this:
- Not crimped cable (and also crimped, because with one easy movement of scissors it turns into elegant shorts, not crimped). You can buy it at any computer store at a price of about 5-10 rubles per meter;
- A pair (as practice shows, more is better) RJ-45 connectors. They cost around 5 rubles apiece. They look like this:


Note: in principle, some also squeeze with their teeth; if you use a screwdriver, it is advisable to be more careful. There were precedents.
How to crimp a cable - process and methods
First, remove the outer insulation.
Option 1. Purely Russian.
Using a knife, pressing lightly, we carefully go along the contour of our cable (if you press too hard, you will damage the core or accidentally cut off the half of the cable).
Option 2. Thoughtful.
The cable, as a rule, has a special thread (usually white nylon), we take it and pull it along the cable. This way it will cut the outer insulation, and the excess can then be cut off with the same knife.

Option 3. Best.
Most advanced crimpers have long had a built-in blade for removing insulation - just insert the cable into the hole, squeeze the tool handles and then remove the winding with your hands. It’s convenient, even, and the insulation is cut, one might say, neck to neck.

Now our cable without insulation consists of 4 pairs of twisted cores and a nylon thread. You can cut the thread immediately. You won't need it. Next, we untangle the veins and try to straighten them as much as possible.

Now we need to determine what type of cable we will make, because how to crimp the cable (in what way), and there are several of these methods.
Cable type or crimping method
There are two of them:
- Direct, - to connect the network card port to the switch/hub.
- Crossover (Crossover) - for directly connecting two network cards installed in computers, as well as for connecting some older models of hubs/switches
In most cases, using a direct crimping sequence is sufficient.
- If you are not sure which type you should use, then find out from your provider’s support in what order the cores should be;
- If you want to connect 2 computers directly, then use the crossover type;
If you want to connect a computer to a hub/switch/, then it is enough to use the direct type.

Straight cable crimping diagram

Crossover cable crimping diagram

So, after you have decided on the diagram, you need to line up our cores (wiring) in one of the above positions. After this, you need to align the veins so that they are as parallel and close to each other as possible, namely, so that neither the veins themselves nor their tips diverge anywhere.

After this, carefully, smoothly, gently and slowly insert the wires into the connector, carefully controlling the process, namely, making sure that the colors do not get mixed up or that two wires do not fit into one track.
Having successfully inserted the cores, laid out and leveled in advance, into both connectors, we insert them (the connectors) into the crimper and firmly clamp the handles.
If everything was done correctly and carefully, then the wire is ready and now the question of how to crimp the cable should not arise before you.
In the case of a screwdriver, everything is somewhat more complicated. We need to secure the connector somewhere and secure the wires so that when crimping the wires do not come out of the connector. We take a screwdriver and push the yellow latches all the way through (they must push through the core insulation in order to make a connection to the wire).
The difficulty is that your wire may fall out when you have already clamped the latch, or if the core has not reached the latch, but you have already pushed it through. Then you will have to use another connector, because this one is broken.
Afterword
These are the wires. So now, I hope, you know how to crimp an RJ 45 cable (for and not only that).
In theory, the article is quite detailed and, if you have the desire, it can be very easily implemented in life, but if you suddenly have any questions, then, as always, ask in the comments - I will be happy to help.
PS: For the existence of this article, special thanks to a friend of the project and a member of our team under the nickname “barn4k”.
For fast and reliable transmission and reception of information, a local network is used, which is created using cables. And in order to reduce the impact of various interferences, a twisted pair cable is used, which is laid from the router to the computer. The cable design consists of 8 cores that are twisted together. There are such unpleasant moments when a conductor fails. In order to fix everything, it is enough to crimp the twisted pair again. In this article we will take a closer look at how to crimp a network cable with and without a crimper, having a regular straight screwdriver on hand.
What tools are needed for the job?
Without a special tool, it will be difficult to crimp the cable. What tool do you need for the job? In order to perform crimping, you must have the following tools:
- Direct network cable or, as it is also called, twisted pair.
- Connector (RJ-45 is used).
- Pincers or crimper. This is a special device that has several working areas.
If you don’t have a crimper, and crimping is done at home and one-time, then it can be done with a screwdriver or pliers. As for the connectors, you should buy several of them so that you have a reserve if it doesn’t work out the first time.

Twisted pair pinout diagrams
Before you get started, you should decide which pattern you need to use to crimp the network cable. There are two types of schemes that differ in purpose, technology and data transmission standard. The difference between the T568A and T568B circuits also lies in the arrangement of the cores.
The color scheme for crimping RJ45 twisted pair cables is as follows:

If you need to establish an Internet connection from the router to the computer, you can use this scheme:

Crimping technology
There are two ways to crimp a network cable:
- direct crimping (used when connecting a computer to a router or switch);
- cross crimp (used for connection diagrams such as computer-to-computer or router-to-router).
There is a certain procedure. The first thing you need to do is strip the insulation from the network cable. You just need to be careful not to damage the insulation of the wiring itself. We talked about this in the corresponding article.

As a result, 4 wires of different colors should be visible. They need to be separated from each other and cut so that they are the same length. Then you should select the scheme according to which you want to crimp the network cable.
Straight type
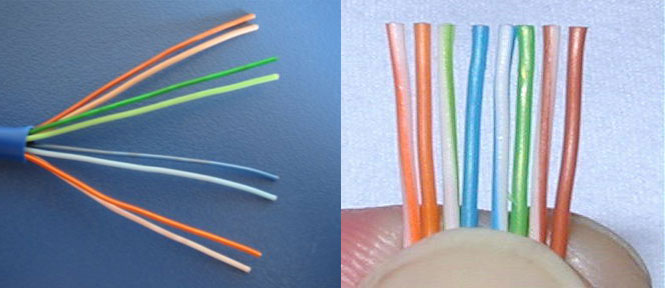
If you choose the direct type, then it is suitable for any traffic. There is only one condition - you need to crimp the network cable equally on both sides. In most cases, this type is used in the T568B circuit. The photo shows how the wiring is divided by color:

But a speed of 1 Gbit/s is rarely needed, since most computer network cards are designed for 100 Mbit/s, and the Internet connection speed is rarely 100 Mbit/s. In this case, the twisted pair is crimped as follows:

After the outer braid has been removed, it is necessary to straighten all the wiring and arrange it in the sequence indicated in the drawing.

The next stage requires special attention. You need to insert the wires into the grooves. In this case, it is very important not to confuse the sequence of wires. If you do this, nothing will work. In order to crimp correctly, the network cable should be inserted into the connector until it stops.

After this, you need to insert the device into the appropriate matrix in the crimping pliers. There may be several of them for connectors of different types (RJ-45, RJ-11). We squeeze the pliers tightly and firmly until the wires in the device cut through the insulation and come into contact with the cord. This is how the twisted pair is crimped.

It is important that the outer braid fits securely into the device. This will prevent damage to the mechanism.
Cross type
This method of crimping an Internet cable is suitable if you want to connect two computers. In this case, the wires at the ends have a different order (one end according to principle A, and the other according to principle B).

Then crimping occurs in the same sequence as the direct type.
Tool-free crimping
You can crimp a network cable without a crimper. If you don’t have a special tool at hand, you can use a regular flat-head screwdriver. But such twisted pair crimping may not be of the highest quality. For example:
- It is not always possible to perform high-quality compression;
- the likelihood of damaging the twisted pair increases.
To do crimping without pliers, you need to do everything the same way. Namely, clean the outer sheath, align the wires and arrange them according to the appropriate electrical diagram. Then you also need to cut off the excess wires and insert them into the grooves of the connector.
After this, you need to turn the connector over so that the contacts are on top and the latch is on the bottom. Place the connector on a flat surface so that it rests securely on the base and use a screwdriver to secure the latch.

It is more difficult to crimp a network cable with a screwdriver, as the work takes more time. You need to press with the tool until the latch stops protruding beyond the edges of the connector. Only in this case will the core be securely fixed and secured.
The twisted pair is compressed with a screwdriver as follows:
- Apply pressure on each conductor in turn. And so on with all eight contacts until they are pressed in all the way.
- Then you need to press the tool on the central part, thus fixing and securely fastening all the contacts in the connector.

Crimping a twisted pair cable in this way should be done carefully, since the contact plates, and the connector itself, are very fragile. If you do everything correctly, you will be able to connect to the Internet.
When using a computer directly to access the Internet, many problems arise, but the biggest one is a technical breakdown that is locally located in the user’s home. Many people think that it is almost impossible to fix a cable break on their own due to the need to crimp its end with an RJ-45 connector (plug). Even if you need to create a new connection when organizing a workplace or buying a TV with an Ethernet port, it is very useful to have the skill of crimping yourself. The article will talk about how to correctly carry out the entire procedure with the simplest tools.
Existing crimping schemes
The most popular are two schemes for crimping the cable used to provide access to the Internet. When connecting, the so-called “twisted pair” is used and crimping is distinguished: straight cable and crossover cable.
- The first option is intended for connecting the following types of devices: computer - switch, Smart TV - router, switch - router, router - computer.
- The second option is intended for combining mainly devices of the same types: computer - computer, switch - switch, router - router, etc.
Most devices that appeared in the recent past and even those being developed today easily cope with identifying the connected cable, and their interface allows the use of both straight and crossover types. However, today's innovation in the production of digital devices is a connection standard such as Auto MDI-X, which is gradually replacing cross-testing. The following are screenshots of straight and cross (oblique) crimping patterns.
Instructions for crimping a cable with an RJ-45 connector
In fact, the crimping procedure is very simple.
- The first step is to clear enough of the cable from its outer sheath. Today, the production of twisted pair cables is carried out in such a way that inside the sheath, in addition to the cable, there is a special thread that can cut the sheath and allow it to be quickly removed to the desired length.

- Having pulled out the wires, you need to align them and position them so that each of them corresponds to the seat for the wire. Using the screenshots with the connection diagrams presented above, you can understand which wire is inserted where. It is also very important to strip the cable from the sheath to such a distance that after insertion into the plug, part of the sheath is under the lock, which will protect the cable from damage when frequently connected and disconnected from the device.

- You can always strip a little more cable, since after this you will have to trim all the wires evenly, as shown in the photo. Each wire must have absolutely the same length and perfect evenness, which will allow them to be placed clearly in the seats directly under the plug contacts.
- Next, we insert the cable, as already mentioned, directly into the seats, so that the ends of the wires are located under the contacts protruding from the plug, and the crimp is eventually fixed with the upper part. As soon as the twisted pair is inserted into the RJ-45, you can fix the entire structure by pressing the lock with a screwdriver (right circle in the photo).

- The left circle in the photo indicates the RJ-45 pins, which should match perfectly with the pins inside your computer's Ethernet connector. After the twisted pair has been inserted into the plug and fixed, all that remains is to lower the contacts directly onto the wires, which is also done with a screwdriver. You should press firmly, but carefully position the surface of the working part of the tool so as not to damage the connecting part.
- Using a conventional tester, you can check the functionality of the cable (ring); if there is no resistance on it or there is no sound signal, then you just need to position the contacts correctly.

- The end result is a cable that will serve the owner for a long time if the basic rules are followed: do not bend, cut, pull, etc.
How to crimp a LAN cable with a screwdriver
If you don’t have special tools like a fixative, then you can do this whole thing using improvised means. To do this you will need the cable itself, a connector, a scissor and a screwdriver. The initial procedures are the same as described above, only after inserting the wires into the connector, you need to fix the wire with a clamp using a screwdriver, and then squeeze each wire with a screwdriver so that each individual wire fits into its groove. Watch the video that explains in detail how to do this.
Special crimping tools
If you have the means and want to quickly crimp twisted pair cables not only for yourself, but also to help your acquaintances, relatives and friends, then you can purchase a special tool that will greatly facilitate the procedure. It's called manual crimping pliers. They, like a stapler, secure the plug to the cable, which has been previously stripped to the required distance. It is worth saying that such a device has become a good help in the work of adjusters and installers from various companies providing access to the Internet. The purchase of such pliers pays for itself in a few calls, and in the future they only require the purchase of forks, which naturally does not require a lot of money.
Bottom line.
If your Internet cable suddenly breaks or the plug itself is damaged, then you should not be upset and wait until the company providing you with access to the Internet begins its work. The problem is especially familiar to those who received such a surprise on weekends. You just have to go to the nearest market and find RJ-45 there. How to secure it is described in detail in this article.
Almost no local network can do without wired segments, where computers are connected to the network using cables. In this material you will learn what types and types of cables are used to create local networks, and you will also learn how to make them yourself.
Almost no local network, be it home or office, can do without wired segments where computers are connected to the network using cables. This is not surprising, because this solution for transferring data between computers is still one of the fastest and most reliable.
Types of network cable
In wired local networks, a special cable called “twisted pair” is used to transmit signals. It is called that because it consists of four pairs of copper strands twisted together, which reduces interference from various sources.
.jpg)
In addition, the twisted pair has a common external dense insulation made of polyvinyl chloride, which is also very little susceptible to electromagnetic interference. Moreover, on sale you can find both an unshielded version of the UTP cable (Unshielded Twisted Pair), and shielded varieties that have an additional foil shield - either common for all pairs (FTP - Foiled Twisted Pair), or for each pair separately (STP - Shielded Twisted Pair).
Using a modified twisted pair cable with a screen (FTP or STP) at home only makes sense when there is high interference or to achieve maximum speeds with a very long cable length, which should preferably not exceed 100 m. In other cases, a cheaper unshielded UTP cable, which can be found, will do at any computer store.
Twisted pair cable is divided into several categories, which are marked from CAT1 to CAT7. But you shouldn’t be immediately afraid of such diversity, since for building home and office computer networks, mostly unscreened cables of the CAT5 category or its slightly improved version CAT5e are used. In some cases, for example, when the network is laid in rooms with large electromagnetic interference, you can use a sixth category cable (CAT6), which has a common foil screen. All of the categories described above are capable of providing data transmission at speeds of 100 Mbit/s when using two pairs of cores, and 1000 Mbit/s when using all four pairs.
Crimping schemes and types of network cable (twisted pair)
Twisted pair crimping is the process of attaching special connectors to the ends of a cable, which use 8-pin 8P8C connectors, which are usually called RJ-45 (although this is somewhat misleading). In this case, the connectors can be either unshielded for UTP cables or shielded for FTP or STP cables.

Avoid purchasing so-called plug-in connectors. They are designed for use with soft stranded cables and require some skill to install.
To lay the wires, 8 small grooves are cut inside the connector (one for each core), above which metal contacts are located at the end. If you hold the connector with the contacts up, the latch facing you, and the cable input is facing you, then the first contact will be located on the right, and the eighth on the left. Pin numbering is important in the crimping procedure, so remember this.
There are two main schemes for distributing wires inside connectors: EIA/TIA-568A and EIA/TIA-568B.

When using the EIA/TIA-568A circuit, wires from pins one to eight are laid out in the following order: White-Green, Green, White-Orange, Blue, White-Blue, Orange, White-Brown, and Brown. In the EIA/TIA-568B circuit, the wires go like this: White-Orange, Orange, White-Green, Blue, White-Blue, Green, White-Brown and Brown.
For the manufacture of network cables used for connecting computer devices and network equipment in various combinations, two main cable crimping options are used: straight and crossover (crossover). Using the first, most common option, cables are made that are used to connect the network interface of a computer and other client devices to switches or routers, as well as connect modern network equipment to each other. The second, less common option is used to make a crossover cable, which allows you to directly connect two computers through network cards, without the use of switching equipment. You may also need a crossover cable to connect old switches into a network via up-link ports.
What to make straight network cable, it is necessary to crimp both ends the same scheme. In this case, you can use either option 568A or 568B (used much more often).

It is worth noting that to make a straight network cable it is not at all necessary to use all four pairs - two will be enough. In this case, using one twisted pair cable, you can connect two computers to the network at once. Thus, if high local traffic is not planned, the wire consumption for building a network can be halved. However, keep in mind that in this case, the maximum data exchange speed of such a cable will drop 10 times - from 1 Gbit/s to 100 Mbit/s.

As can be seen from the figure, in this example the Orange and Green pairs are used. To crimp the second connector, the place of the Orange pair is taken by Brown, and the place of Green by Blue. In this case, the connection diagram to the contacts is preserved.
For the manufacture of crossover cable necessary one crimp its end according to circuit 568A, and second- according to the 568V scheme.

Unlike a straight cable, all 8 cores must always be used to make a crossover. At the same time, a crossover cable for data exchange between computers at speeds of up to 1000 Mbit/s is manufactured in a special way.

One end of it is crimped according to the EIA/TIA-568B scheme, and the other has the following sequence: White-green, Green, White-orange, White-brown, Brown, Orange, Blue, White-blue. Thus, we see that in circuit 568A the Blue and Brown pairs have swapped places while maintaining the sequence.
Finishing the conversation about circuits, we summarize: by crimping both ends of the cable according to the 568V circuit (2 or 4 pairs), we get straight cable to connect a computer to a switch or router. By crimping one end according to circuit 568A and the other according to circuit 568B, we get crossover cable for connecting two computers without switching equipment. The manufacture of a gigabit crossover cable is a special issue, where a special circuit is required.
Crimping a network cable (twisted pair)
For the cable crimping procedure itself, we will need a special crimping tool called a crimper. Crimper is a pliers with several working areas.

In most cases, knives for cutting twisted pair wires are placed closer to the tool handles. Here, in some modifications, you can find a special recess for stripping the outer insulation of the cable. Further, in the center of the working area, there are one or two sockets for crimping network (marking 8P) and telephone (marking 6P) cables.
Before crimping the connectors, cut a piece of cable of the required length at a right angle. Then, on each side, remove the common outer insulating sheath by 25-30 mm. At the same time, do not damage the own insulation of the conductors located inside the twisted pair.
Next, we begin the process of sorting the cores by color, according to the selected crimping pattern. To do this, unravel and align the wires, then arrange them in a row in the desired order, pressing them tightly together, and then cut the ends with a crimper knife, leaving approximately 12-13 mm from the edge of the insulation.
Now we carefully place the connector on the cable, making sure that the wires do not get mixed up and that each of them fits into its own channel. Push the wires all the way until they rest against the front wall of the connector. With the correct length of the ends of the conductors, they should all fit into the connector all the way, and the insulating sheath must be inside the housing. If this is not the case, then remove the wires and shorten them somewhat.

After you have placed the connector on the cable, all that remains is to fix it there. To do this, insert the connector into the corresponding socket located on the crimping tool and smoothly squeeze the handles until they stop.
Of course, it’s good when you have a crimper at home, but what if you don’t have one, but you really need to crimp the cable? It is clear that you can remove the outer insulation with a knife, and use ordinary wire cutters to trim the cores, but what about the crimping itself? In exceptional cases, you can use a narrow screwdriver or the same knife for this.

Place a screwdriver on top of the contact and press it so that the teeth of the contact cut into the conductor. It is clear that this procedure must be done with all eight contacts. Finally, push the central cross section to secure it in the cable insulation connector.
And finally, I’ll give you a little advice: Before crimping the cable and connectors for the first time, buy with a reserve, since not everyone can perform this procedure well the first time.