Koschey metal detector 2 and LCD diagram. "Koschey" (metal detector): review, characteristics, settings, diagram
Pulse metal detectors Koschey-5I and Koschey-5IM
Developed in the early 2000s, our pulse metal detectors Koschey-2I and Koschey-4IG have earned a reputation as simple, reliable and inexpensive devices. But progress does not stand still at the beginning of 2007. they were replaced by a new model - Koschey-5. This is a universal pulse metal detector, which eliminates the shortcomings of previous models and adds new features.
The universal pulse metal detector has two versions: Koschey-5I (LED version) and Koschey-5IM (version with LCD screen and film keyboard). Both modifications have exactly the same printed circuit board and differ from each other only in the control and display elements. For do-it-yourselfers, devices are available in the form of a set of semi-finished products from our production, as well as in the form of RI8042 kits.
Considering all of the above, we can say that the Koschey-5I and Koschey-5IM devices implement the best qualities of pulsed metal detectors. This is confirmed by user reviews and the steady demand for this model over recent years.
ARCHIVE
| * | Documentation for new projects: |
| 1 | Operating instructions for the Koschey-5I metal detector. (doc+zip) |
| 2 | Operating instructions for the Koschey-5IM metal detector. (doc+zip) |
| 3 |
Microprocessor pulse metal detector Tracker PI appeared on the market back in 2003, and immediately gained enormous popularity among users. Then the scheme received some improvements, and several firmware versions were released, incl. and deep and from the “first Tracker” appeared Tracker PI-2, Koschey 2I and Koschey 4IG.
Koschey 2I is a commercial metal detector (its firmware is not freely available), but you can buy not only the assembled metal detector, but also a board and kit for self-assembly. “Master Keith” released this set under the number NM8042 (Tracker PI), but with the advent of Koshchei 5I, this is what is sold under this number more often. But a more complete version of the kit has appeared with a modified board (Tracker PI-2), with components not only for the unit, but also for the manufacture of a search coil, which is sold in the Tracker private enterprise store (website: http://detectori.com.ua /).
 Koschey 2I and Tracker PI-2- this is one metal detector, and Koschey 4IG is its deep version, differs in the microcontroller firmware. This metal detector was also sold by many under various other names.
Based on the Koshchei 2I scheme, a non-commercial metal detector, Clone (With open firmware), was developed. But Koschey 2I worked frankly better than Clones, and even all the improvements are only trying to get closer to Koschey 2I in terms of quality of work. And even the Koschey 5I released by the company was not far ahead of the Koschey 2I.
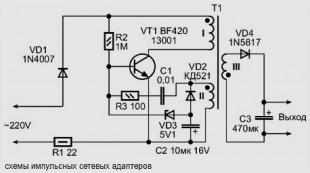
Circuit of the Tracker PI metal detector (initial version of the circuit, also the circuit is relevant for the NM8042 kit)
 Diagram of the metal detector Koschey 2I, Koschey 4IG and Tracker PI-2
 Single-sided board version of the Koschey 2I metal detector:

Double-sided board (archive) -
There is no full-fledged firmware for the Koschey 2I metal detector in the public domain. But there are 2 demo versions, in which the depth is significantly reduced and there is no sensitivity adjustment, but it is quite enough to test the metal detector and even search a little (with a 20 cm coil, depth up to 0.5 m). You can buy full versions of the firmware from the authors of the device, or in stores where they sell Koschey metal detectors.
Making your own metal detector Koschey 2I (Tracker Pi-2)
To make your own Koschey 2I metal detector, below are all the materials except the firmware, but to make your life easier, you can immediately buy a ready-made board or a kit for assembling it. But if you want to do everything yourself, then you can do it this way.
Description of the operating principles of the Tracker PI metal detector, diagram and description for assembly (From the Master Kit website) –
Description of self-assembly of the Koschey 2I metal detector from the authors’ website -
Demo firmware for the Koschey 2I metal detector can be downloaded here –
Coil for metal detector Koschey 2i very easy to make. A mandrel with a diameter of 190 mm is wrapped with 27 turns of 0.7-0.8 mm wire. The wires are wound with electrical tape and secured in a suitable housing. After which the coil is connected to the metal detector unit, and it is adjusted using the trimming resistor R7 on the board.
More details description of the coil manufacturing process to the metal detector Tracker Pi-2 (Koschey 2I) -
Also, Tracker PI-2 has deep firmware, and then it is possible to manufacture and connect depth frames to it. Here .
To improve sensitivity to small objects, you can make a basket sensor, described in, it will give an increase of 2-3 cm to the coin search depth.
Operating instructions for the Koschey 2I metal detector -
Operating instructions for the Koschey 4IG metal detector –
Video of the Koschey 2I metal detector (Tracker PI-2):
Conclusion: Koschey 2I (Tracker PI-2) is an excellent pulse metal detector, with good search depth, simple circuitry and excellent operational reliability. Other pulse metal detectors work the same, or often worse, than the Koshchei 2I, which makes it a relevant metal detector for more than 10 years after it appeared on the market.
When writing this article, materials from the developers’ website were used - metdet.ru/
2017-08-01 at 00:24
Another dream from childhood. Your own personal metal detector. You can look for all sorts of trinkets in the backyard, at friends’ dachas. I wonder what could be hiding underground. And then an idea came to mind. Why not assemble it yourself? I started researching the topic and found out that the most popular homemade metal detector is the Tracker PI-2. It is also called Koschey Metal Detector - 2I. Why Koschey? It comes from the names of the developers of the firmware and circuit of the metal detector.
Here I will tell you how I assembled this metal detector, what difficulties I encountered and how to put it into operation.
First, a diagram of the metal detector.
I decided that I would draw a board for my case, which has been lying idle for a long time. It was Kradex Z-50. I had to develop a board for it. Here's the development process...


Then an idea arose. Draw a board and try to order it from a manufacturer in China. I won’t tell you everything about this topic here. The result was a board like this.


The article is in the process of being written!!!
Don't miss updates! Subscribe to our group
Not produced.
This is a modern microprocessor multi frequency metal detector The device is designed to search for metal objects in the ground, sand, walls, thick grass, etc.
Operating principle metal detector KOSHCHEY-20M
Koschey 20m uses the new Atmel ATXMEGA series processor, which significantly improves the processing speed and performance of the metal detector. Externally, the Koschey-20M has not changed; it is made in the same form factor as the previous version of the Koschey-18M; the design and ergonomics of the metal detector have not changed since they have proven themselves to be the best and have passed serious tests in practice. The menu interface has been preserved, it is also simple and clear.
Electronic unit koschei 20m
Differences between Koschey 20m and 18m.
- The power supply has decreased significantly (it has become 3 times lower), the device is powered by 4 AA batteries (voltage only 3.7-7V). Now the metal detector is equipped with a resonant sensor (also compatible with a non-resonant sensor) and the test in air shows a depth of 5 kopecks 36 cm instead 30 earlier.
- Koschey 20m is now multi-frequency (instead of 2) Koschey-20M operates at any frequency in the range from 4 to 10 kHz (the ability to connect a homemade sensor or branded sensors from other manufacturers) The extended dynamic range of Koschey-20M is 4 times wider than that of Koschey-18M, this allows the device to more accurately recognize targets in difficult search conditions (as well as a static electronic compensation channel, which expands the total dynamic range, allowing to significantly reduce the requirements for the quality of sensor balancing)
- A protection mode has appeared, entry using a PIN code; in the event of theft, the detector will not work.
- Device operating hours counter. The metal detector keeps track of hours worked to the nearest minute.
Test table for Koschey 20m metal detector:
Coin scales 15 cm
Coin 5 kopecks USSR 35 cm
Coin 5 kopecks E2 39 cm
helmet - 1.2 meters
tank - 2 meters
What will you have in the kit:

DELIVERY in MOSCOW
Delivery of orders in Moscow is carried out daily, seven days a week, at a time convenient for you. For order values over RUB 10,000, delivery Free,
350
rub.
DELIVERY TIME IN MOSCOW
PAYMENT FOR ORDERS:
1. Cash to the courier. In Moscow, you can pay your order in cash to the courier upon receipt.
2. Pickup in our Store: Metro Komsomolskaya, Kazansky railway station, Komsomolskaya square d2, Kazansky shopping center pavilion 24
Opening hours: Mon-Sun from 09.00 to 21.00 (daily, seven days a week)
3. Prepayment to a Sberbank card
4. On credit: purchase on credit conditions
Instructions for assembling a sensor for metal detectorsVM8042(Koschei-2I), VM8044(Koschei-5I,5IM)
ATTENTION! Read all instructions before starting work.
The BOXxxxx kit (BOX8044?) is intended for the manufacture of sensors for various electronic metal detectors. The set consists of two body halves, a bracket for connecting to the metal detector rod (PG-7 pressure seal and a set of stainless steel screws). The design of the housing is quite universal and allows the manufacture of sensors for almost all types of metal detectors. This manual will discuss the procedure for assembling the sensor for pulse metal detectors VM8042 (Koschei-2I) and VM8044 (Koschei-5I, 5IM).
First you need to prepare the sensor housing. To do this, the halves need to be divided into “upper” and “lower”. On the upper half you need to drill six holes with a diameter of 3 mm and one with a diameter of 7-8 mm in the indicated places, as shown in the figure.
On the bottom half you need to drill eight holes with a diameter of 3mm in the indicated places

Then, on the outer side of the lower half of the drilled holes, using a drill with a diameter of 6-7mm, you need to make a countersink (a cone-shaped recess for the head of the self-tapping screw). It is better to perform this operation not with a drill, but by rotating the drill by hand, so as not to accidentally drill a hole through. 
The next step is winding the coil. For this we need a mandrel with a diameter of 170-182mm. A fairly simple mandrel can be made from scrap boards or thick plywood. A circle of the required diameter is drawn on the board and 20-40 small nails are driven along its contour at an equal distance. It is advisable to first put pieces of PVC tube on the nails so as not to accidentally damage the wire insulation when winding. Next, we wind the coil onto the resulting mandrel. For the VM8042 (Koshchey-2I) metal detector, we will need to wind 27 turns of enameled wire with a diameter of 0.63-0.67 mm. For the metal detector VM8044 (Koschei-5I, 5IM), the coil must contain 32 turns. This metal detector is much less sensitive to the parameters of the sensor, so you can use a wire with a diameter of 0.5-0.8mm. After winding, the coils need to be fastened in several places with threads, then bend the nails inward and remove the coil.
If you don’t have a board at hand, you can use other available means as a mandrel. For example, this could be a saucepan or other utensils of suitable diameter . 
The next step is to wrap the coil with electrical tape. This operation is intended to secure the coils, as well as partially seal them. Attention: it is not recommended to impregnate coils for pulse metal detectors with various varnishes or epoxy resin. These materials have a high dielectric constant, so the penetration of impregnating material into the interturn space will lead to a significant increase in the interturn capacitance, which, in turn, will lead to a deterioration in the parameters of the metal detector.
Next, we place the coil in the lower half of the housing and secure it there with hot glue. As an option, the coil can be glued with Moment glue. 
Now let's move on to connecting the sensor. It is recommended to use a flexible network cable with a conductor cross-section of 2x0.75 sq. mm as a cable. In such a cable, each conductor consists of a bundle of thin copper wires. You should choose a cable whose outer insulation has a round cross-section. Such a cable will be clamped well in the sealed lead-in. We will need a piece 1.2-1.3m long. We screw the pressure seal to the bracket. The fastening nut of the sealed gland on the inside of the bracket should be fixed using “Moment” glue or hot melt adhesive. Then we thread the cable into the cable gland and cut the ends.

Next we need to secure the bracket to the upper half of the case. For this, six stainless steel screws are used. Two of them are 3x20mm (3x25mm), the rest are 3x12mm. Attention: Only stainless steel screws can be used for fastening! Metal detectors react poorly to stainless steel, so such screws do not have a noticeable effect on the operation of the sensor. The use of self-tapping screws made of ordinary steel will greatly degrade the performance of the sensor. It is easy to distinguish stainless steel screws from ordinary ones - stainless steelare practically not attracted to a permanent magnet.
If you use a very powerful magnet for testing, for example, from a faulty computer hard drive, stainless steel screws will “stick” slightly. But the strength of this “sticking” will be tens of times weaker. For comparison, in this case it is recommended to bring an ordinary iron nail of comparable size to the magnet - everything will become clear.
Also, on the upper half of the case, using side cutters, you need to make a small window in the inner side for cable routing (see figure).

Now we solder the ends of the coil to the cable, protecting the soldering points with PVC pipes. 
Now you need to check the functionality of the sensor. We connect the reverse end of the cable to the electronic unit according to the instructions for the metal detector (using a connector or by direct soldering to the board). For the VM8042 (Koshchey-2I) metal detector, you will need to adjust the electronic unit to the sensor using resistor R7 (see the kit instructions). The metal detector VM8044 (Koschey-5I, 5IM) will adjust to the sensor automatically after pressing the “BALANCE” button. By bringing various metal objects to the sensor, we make sure that the metal detector is working normally. For VM8042 (Koschei-2I), the maximum air detection range for a coin with a diameter of 25 mm (5 kopecks USSR) should be up to 23-26 cm, for VM8044 (Koschei-5I, 5IM) - up to 27-30 cm (when working in profile 1.2).
If the test is successful, the sensor can be finally assembled. Carefully combine the two halves of the body. At the same time, we make sure that the ends of the cable and coil lie in the made window and do not fall into the joints of the halves. After this, screw eight stainless steel screws measuring 3x15mm onto the bottom side of the case.

There is also an alternative way to assemble the body - gluing. In this case, there is no need to drill holes in the lower half of the housing. All edges of both halves need to be carefully coated with Moment glue or another glue for gluing plastic, and then align them. Carefully remove any glue that has come out. Press down the sensor with some kind of weight and leave it in this state for the time specified in the instructions for the glue. After this, the sensor will be ready for use.
Special attention should be paid to sensors that are supposed to be used in conditions of high humidity. For example, for searching in shallow water with submersion. Such sensors need to be given additional tightness. The easiest way to do this is to fill the sensor cavity with epoxy resin. To do this, you must first (before assembly) drill an additional hole with a diameter of 5-6mm in the upper half of the case. Once the sensor is assembled, epoxy resin is pumped into this hole. Because the coil is wrapped with electrical tape, the viscous resin will not get into the interturn space, but only seals the coil from the outside. It is convenient to use a large-volume medical disposable syringe to pump resin. The resin must first be diluted with a hardener (approximately 170ml-200ml of resin will be required). First, the piston is pulled out of the syringe and a portion of resin is poured into it through the top hole, then the piston is put in place and the resin is squeezed into the hole. Then the operation is repeated. You need to pump slowly so that the air has time to escape through the hole without bubbles. It is advisable to work with rubber gloves. After the resin has hardened, the sensor will be ready for use.
It should be borne in mind that such filling will noticeably make the sensor heavier (by about 200-250g). Therefore, such an operation is justified only for underwater searches - such a sensor, in addition to being sealed, will also have the necessary negative buoyancy.