Usb extension cable with twisted pair hands. How to make a long USB extension cable from a network cable? Pinout of USB sockets and plugs
I have to travel very often on business trips, so I try to take the Internet with me. Of course, it’s good when the hotel has wi-fi or a normal 3g signal for a USB modem, but it’s not always available in the room, then a 5-6 meter USB extension cable from .

Preparatory stage: Having looked in a pile of household rubbish, I found a burnt motherboard from which I carefully removed the USB socket with a soldering gun and a piece of cable with a USB plug at the end, left over from previous experiments.
Bad experience assembling an extension cord: At first, I tried to connect the USB connectors with a five-meter piece of audio-video cable, but when I inserted the modem, the window “said” that the device was not working properly. The most interesting thing is that the printer worked quite normally.
Attempt number 2. To assemble an extension cord with my own hands, I decided to use twisted pair, especially since I had a lot of Ethernet cable left over from the time I installed local networks. Unfortunately, the network cables were without protective shields and had four twisted pairs in plastic insulation. To transmit signal and power according to the USB 2.0 standard, over a distance of up to five meters, you can use only two twisted pairs. However, in the case of a 10-meter extension cord, it is better to run the power over two or three twisted pairs.

For power supply, you can take one or all of the remaining twisted pairs connected in parallel.

We attach the USB socket to a hard Ethernet cable. First, we isolate the contacts from the rear and bottom walls of the case. Then, using sewing thread, we attach a piece of PVC tube or cambric to the cable. Fix the end of the thread with molten rosin or glue. We make 2 longitudinal cuts on the cambric and insulation. The resulting “petals” should look like a cross. Solder the ends of the twisted pairs to the desired pins. We attach the “petals” to the socket body with threads. We fix the end of the thread. At the end of the operation, you can refine the USB socket by putting on a heat-shrinkable tube.
To add more rigidity, you can wrap copper wire around the edge of the cable. Then solder its ends to the side walls of the socket and cover the joint with low-temperature hot-melt adhesive, and only then heat-shrink it.

Connecting two cables. We cut the ends of the cable and the section with the plug to different lengths to avoid shorting the wires. To reduce the load at the connection point, I put the insulation of the network cable on the section with the plug. The final connection and giving the appropriate appearance is done using heat shrink of a suitable size.
The result of the work can be seen in the top photo.
If you assemble a USB extension cable with a length of more than 10-15 meters without additional power with your own hands, the device connected through it will work unstably. Therefore, it is necessary to use a version of the extension cord circuit with external power supply. That is, to the red wire (+5V) you need to apply +5V from an external power source, to the black wire, connect “-”.

This version of the circuit is fully operational at distances up to 15 meters.
This video shows the process of assembling a very long twisted pair USB extension cable with your own hands. The device connected to it can operate at a distance of up to 50 meters from a PC or laptop!
5 volts = blue, orange, white-orange
-DATA (information) = white-green
+DATA = green
GND (ground) = brown, white-brown, white-blue
Sometimes when working on business trips you have to use a laptop that is not equipped with a built-in 3G modem. A USB modem helps. However, the following problem arises: for some reason the signal is not always strong, and when the signal strength decreases, the speed of the Internet also drops. Work at various workplaces showed that the operation of the modem is affected by the material of the table surface and the presence of shielding metal objects in the room. Sometimes literally moving the laptop 5-15 cm improves the speed of the modem. The theory of radio wave propagation suggests that the best conditions for receiving and transmitting radio waves by an antenna occur in the absence of electrically conductive objects at a distance of up to 5-10 wavelengths, and more distant large conductive objects can change the transmission and reception pattern. In addition, users of USB modems and flash drives have repeatedly broken the USB connection when they unsuccessfully moved a laptop or objects near the laptop. To improve the operation of the modem and maintain the mobility of the laptop on the desktop, a short rigid extension cable for the USB modem has been designed.
How to make a USB extension cable for a modem
1. A USB flashlight is used as the base of the extension cord. The LED tip can be easily removed and removed.
2. Using a utility knife, cut the USB connector plug and gain access to the connector contacts. Use a soldering iron to remove the wires from the connector. We pull the wires out of the extension tube and pull out the stiffening wire.
3. We shorten the tube with our own hands to 13-15 cm. Prepare 4 thin conductors 20-25 cm long. Shorten the stiffening wire to 17-20 cm. Prepare 4 thin conductors 20-25 cm long. Insert four conductors into the tube.
4. We form a bend at the end of the wire to securely support the modem. We insert the stiffening wire into the tube. If the conductors are difficult to tighten, the extension cord will not last long and over time the conductors may break when the extension cord is bent. In this case, it is better to choose a tube of a larger diameter so that the stiffening wire and conductors fit freely.
5. Solder the conductors to the connector. To connect the screens we use stiffening wire, screwing pieces of copper wire to the ends.
6. The receiving socket for the modem is made from a PS/2 - USB mouse adapter. The case is cut on one side with a knife, the connectors filled with hot glue are removed and the USB socket is released by heating. Solder the conductors to the connector. Important, especially the power supply. You can simplify the task by soldering the conductors to the connectors connected together.
PS/2 to USB adapter
Connectors are aligned
7. After soldering the conductors, you can check the functionality of the extension cord on the flash drive. If the computer sees the flash drive, we assemble an extension cord. We assemble the plug to the computer using glue or simply tighten it with electrical tape; during assembly, we carefully lay out the conductors and stiffening wire; there should be no mutual short circuits!
8. Fill the socket for connecting the modem in the case with hot glue.
![]()
![]()
![]()
![]()
![]()
![]()
![]()
![]()
![]()
![]()
![]()
There was an old meter extension cord and a 9-meter stub of twisted pair cable. From all this I decided to try soldering a USB extension cable. So that at any time you can connect any device, flash drive, camera or other gadget to your computer. And at the same time find out whether this homemade design will work.

Twisted pair without screen.

It was a pity to gut such beautiful plugs, but I really didn’t like the thickness of its veins.
Long USB extension cable
Moreover, having read nightmares about losses and weakening of the signal due to an increase in cable length.


I used one vein for “data” and three for “food”. We clean it, twist the triple ones together and tin it all.

I unsoldered everything following this diagram found on the internet.


It would be desirable for the wire to have a shield, but since I don’t have one, I cut off all the clamps from the pieces of iron.
I thoroughly filled the voids between the soldered wires with hot glue and at the same time cast the non-separable plug housings with a slight overlap on the glands and the general insulation of the wire.


By the way, try to pour less glue on the sides of the male plug, since due to the thick handle it may not fit into the socket on the motherboard if the space next to it is already occupied.

Yes, it's ugly, but strangely enough, it works. So far I have only tested it on a camera and a webcam.

The other day I received a flash drive in the mail that I ordered in China, everything was determined and connected without problems, although I did not choose the most expensive and fastest one.

There is no printer or external drive available, so there is no way to check anything serious.
Other site pages


When copying materials from the site, an active backlink to the site www.mihaniko.ru is required.
9zip.ruInstructions USB printer cable extension
Hello to all radio amateurs and radio tormentors! The topic of this article is banal: there is a computer and there is a printer, and the distance between them is large - about three meters. To print, I had to drag the printer closer, print, and then carry it back. Agree, it’s inconvenient.
Due to great laziness, I decided to puzzle myself with a USB cable extension for the printer. The first thing that came to mind was to look at what was in stores. A visit to those closest to us (don’t forget, I’m lazy) showed that three-meter USB-LPT cables are offered from 400. In this situation, I can carry the printer back and forth myself.
On the Chinese website Aliexpress, such cables are offered at half the price. But even then I thought about it: I have wires. Why do I need other wires? In fact, the same thing will happen. And, armed with blue electrical tape and a soldering iron, I began making a printer wire extension.
So, what are the requirements when creating such a cable? First of all, it is protection against interference.
I did not solve this problem, because it had already been solved: I found two one and a half meter four-core printer cables. We join them together - and here they are the required three meters. We fasten them in the center with blue electrical tape. In fact, it is only needed as a fetish, because each vein is covered with heat shrink. But tradition demands: we wrap it all with blue electrical tape.
One of the ends of the cable was cut off. Here was an opportunity to experiment. There was a USB male connector without a housing. What can be used as a body? That's right, epoxy. We place the end of the wire with the soldered connector in a PVC tube (so that the epoxy does not stick) and wait for the glue to harden. Be careful, the epoxy rises by capillary effect where it is not needed.

When the glue hardens, you can take out the newly made connector and try it out. Excess glue should be removed. The surface of the epoxy will be oily - this is probably because the hardener has come to the surface. It should be washed off with acetone. Then you can paint. As a result, we have a USB printer cable extension cable for free.
Any questions or comments?
User tags: printer cable re-soldering, printer extension cable [ What is this? ]
Further in the instructions section: For beginning audiophiles, very often beginning audio enthusiasts want to assemble a high-quality audio system for themselves and do not know what to choose and how to do it. This collection of questions and answers was developed especially for them. compiled based on the most frequently asked questions.
High speed connections
Currently, two highly #
high-speed devices with serial bus: USB and IEEE
1394, also called i.Link
or FireWire. These high speed communication ports are different from standard ones
parallel and serial ports installed in most modern computers
Pewters, with more opportunities. The advantage of the new ports is that
they can be used as an alternative to SCSI for high-speed connections from peripherals
peripheral devices, as well as connect to them all types of external peripheral devices#
swarms (i.e.
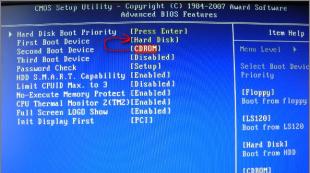
Maximum USB cable length
in this case, an attempt was made to combine input/output devices).
Why do you need a serial connection?
A new direction in the development of high-speed peripheral buses is
use of sequential architecture. To transmit information in parallel
architectures where bits are transmitted simultaneously require lines having 8, 16 or more
wires It can be assumed that at the same time, through a parallel channel, #
more data is transmitted than through serial, but actually increases the throughput#
The ability of a serial connection is much easier than that of a parallel connection.
The serial bus allows 1 bit of data to be transmitted at a time. Thanks to
The absence of delays during data transfer significantly increases the clock frequency.
For example, the maximum data transfer rate of the EPP/ECP parallel port has reached#
2 MB/s, while the IEEE#1394 ports (which use high-speed
serial technology) support data transfer rates of 400 Mbit/s
(about 50 MB/s), i.e. 25 times higher. Data transfer speed of modern interfaces
IEEE#1394b (FireWire 800) reaches 800 Mbps (or about 100 MB/s), which is 50 times faster#
Increases parallel port transfer speed! Finally, interface performance
USB 2.0 reaches 480 Mbps (about 60 MB/s).
Another advantage of the serial data transfer method is the ability
using only one # or two wire channel, so the interference that occurs when
transmission are very small, which cannot be said about a parallel connection.
The cost of parallel cables is quite high, since the wires designed
for parallel transmission, are not only used in large quantities, but also specially#
carefully placed to prevent interference, which is very difficult#
intensive and expensive process. Serial data cables, on the other hand,
very cheap, as they consist of several wires and require shielding
much lower than those used for parallel connections.
That is why, and also taking into account the requirements of the external peripheral interface
Plug and Play and the need to eliminate the physical clutter of ports in a portable
computers, these two high-speed serial buses were developed,
already in use today. Despite the fact that the IEEE 1394 bus was originally intended
Designed for highly specialized use (for example, with DV video cameras),
it is currently used with other devices, such as professional
digital scanners and external hard drives.
Table 8.4. Dependence of the maximum cable length on the resistivity of the wires
Thickness, mm Resistivity, Ohm/m Length (max.), m
28 0,232 0,81
26 0,145 1,31
24 0,091 2,08
22 0,057 3,33
20 0,036 5,00
Parallel connection has a number of disadvantages, one of which is phase
New signal shift, which limits the length of parallel channels, such as SCSI
(should not exceed 3 m). The problem is that although 8# and 16#bit data are simultaneously#
but are sent by the transmitter, due to delays some bits arrive at the receiver earlier
others. Therefore, the longer the cable, the longer the delay time between the first and second #
the last bits to arrive at the receiving end.
http://www.megalib.com/books/1617/part.pdf
Content:When working with computer equipment, some non-standard additional devices are often required. For example, when setting up a local network, you may need a cable of various lengths equipped with USB connectors. However, standard factory-made products do not always meet the requirements. In such cases, you have to make a USB extension cable yourself.
Operating principle and scope of application of USB extension cables
To make a normal working extension cord, you need to have a good knowledge of its properties and operating principle. Its length primarily depends on this. Everyone knows that using a regular cable it is possible to connect remote devices over a distance of 3-5 meters. These cables are considered passive extension cords, and in many cases this distance is not sufficient to ensure proper operation in a home or office. It is not always possible to locate a printer, scanner and other peripheral devices close to the computer.
This problem is successfully solved by an active USB extension cable, which is fundamentally different from a regular cable. Its useful qualities are manifested through active amplifiers built into each end and receiving power from the USB connectors within 5 volts. Due to this, the useful signal is amplified many times over, which makes it possible to connect devices remote from the computer at a distance of 50 meters or more.
In the process of signal transmission, its inevitable weakening occurs. In this regard, for long distances (over 5 meters), a connection using only the USB 1.1 protocol is used. At a distance of up to 30 meters, it is necessary to use the faster USB 2.0 protocol. The cable connecting the devices to each other is of great importance. It must be of high quality, guaranteeing the same high connection speed.
The extender operates independently without any drivers and does not affect the state of the computer in any way. You just need to insert the USB plugs located at the ends of the wire into the corresponding connectors of the connected equipment.
Extension cord manufacturing process
It should be noted right away that making a USB extension cable yourself requires special knowledge and practical skills in working with a soldering iron and other power tools. Otherwise, it is recommended to purchase a finished product of the required length, although it will be more expensive than a homemade one. However, many still try to make a USB extension cable on their own.

First of all, you need to stock up on a short-length standard USB cable. If possible, it should have a ferrite core, which can absorb high-frequency interference and indicates a high quality cable. You can ask for such a piece or buy it inexpensively from people who deal with cable lines. You can also ask them for the required amount of UTP computer cable, preferably one of the high categories, for example, 5e, 6 or 6e. The speed of operation of the equipment at the opposite end will depend on this.
The tool you will need is wire cutters or scissors to cut the cable. This is done with a special tool, but if you don’t have one, you can get by with a simple knife. For connections you will need a soldering iron, solder and rosin, since twisting the wires is not allowed due to their high resistance. The joints are insulated with heat-shrinkable tubes. You can use electrical tape instead.
Work begins with cutting the cables into pieces of the required length and stripping the ends. The insulation from all conductors is removed by approximately 3-5 mm. A USB cable contains 4 conductors, a UTP cable - 8. One pair of UTP cable includes two wires - colored and variegated. Instead of a colorful one, there may be a white wire. Each such pair is soldered to a separate USB cable wire in accordance with the corresponding colors. Using the same scheme, a USB extension cable with additional power is made with your own hands, known as an active extension cable.

Upon completion of soldering, you need to check that there are no torn spots left. After this, the heat-shrinkable tubes are moved to the soldering areas and heated with a hair dryer until they are completely adjacent to the connected conductors. After all the heat shrink on the conductors has cooled, they are collected together into a single bundle, on top of which a common heat shrink tube is installed in the same way. Before connecting the equipment for the first time, it is advisable to check the contacts using a tester. If the check shows the norm, then the homemade extension cord can be used for work.
USB twisted pair extension cable
Twisted pair extension cords are mainly used to connect the Internet via a 3G modem. These devices are used in dachas and country houses, in the absence of the possibility of regular cable Internet. Situations often arise when reliable reception of a 3G signal is only possible from a certain location to which a separate cable needs to be connected. Often a USB extension cable of the required size is not available for sale, so the only option is to make it yourself.

For this purpose, you will need the required amount of twisted pair, shielded with foil, two USB connectors AM and AF, that is, “male” and “female,” 16 mm heat-shrinkable tubing, and electrical tape. The tools you will need are a knife, side cutters, a soldering iron, solder and flux.
The manufacturing process begins with pairing and straightening the twisted pair ends with side cutters. After this, using a knife, you need to remove the top sheath of the cable along with the foil from each end to a distance of 1 cm. This operation must be done very carefully so as not to cut the wires located under the sheath. Brown-white and brown wires are cut flush with the sheath, since they will not be used in the future. From the remaining conductors you need to remove 3 mm of the insulating layer. The wires are connected as follows: green to orange and green-white to orange-white. The joints are carefully soldered.

The heat-shrinkable tube is pre-cut into pieces of 4 cm each and put on the twisted pair. This will allow you to avoid unsoldering the connector in the future. The correct wiring should be checked very carefully, since accidental confusion can lead to failure of the USB device.
After checking, you need to turn on the modem in test mode. If the computer does not recognize the device or shows incorrect operation, you need to try a different connector. The absence of a positive result indicates too much current consumption. Since the wires are very thin, the modem simply does not have enough voltage. You may have to shorten the wire until the device starts working or increase the cross-section of the wires. If the entire system is working normally, all that remains is to put heat-shrinkable tubes on the connectors and, after heating, check the quality of the insulation.

I had the following connectors at my disposal: a USB socket designed for installation in a printed circuit board and an 80-centimeter piece of cable with a USB plug at the end.

First, I tried to make a flexible extension cable from a 4-meter audio-video cable, but the attempt was unsuccessful. When I inserted the flash drive into this cable, the OS “said” that the device was not working correctly.

So, it was decided to use twisted pair, especially since I had several pieces of Ethernet network cable left over from the days of distributing the Internet via a local network. The network cables turned out to be of the lowest quality, since they did not have any screens. All pieces of cable had four twisted pairs in plastic insulation. Judging by the color and rigidity of the veins themselves, they were made of some kind of copper alloy, similar to brass.
To transmit signal and power in USB2.0 format, over a distance of up to 5 meters, just two twisted pairs are sufficient. The remaining twisted pairs may not be used.
However, if the resistance of the cable cores is high, and the device connected to the end of the cable consumes significant current, then you can supply power through two or even three twisted pairs at once.
Let's take a closer look at this point.
For example, if the current consumed by a USB device is 400 mA, and the resistance of one pair is 2 Ohms (both ends), then the resistance of the USB device will be equal to:
5 / 0,4 = 12,5 (Ohm)
In this case, the voltage drop on the cable will be:
5 * 2/ (12,5 + 2) ≈ 0,69 (Volt)
Which, of course, is a bit much.
But, if you use three pairs at once:
2 / 3 ≈ 0,67 (Volt)
5 * 0,67/ (12,5 + 0,67) ≈ 0,25 (Volt)
The voltage drop on the cable will decrease and will no longer be so critical.
About the pinout of USB plugs and sockets

The picture shows the pinout of the USB 2.0 socket and plug.

To transmit data (+Data and –Data), you can use any of the four available twisted pairs.

To connect power, you can use any of the three remaining twisted pairs or all three pairs connected in parallel.
How to attach a USB socket to a hard network cable
The assembly of my cable was somewhat complicated due to the fact that I had at my disposal not a USB cable socket, but a socket for printed circuit boards.

I had to first isolate the contacts from the back wall of the case.

And then from the bottom wall of the case (shown in the photo above).
For a cable that is not very rigid, for example, consisting of only two twisted pairs, you can use this method of attaching the socket to the cable.

First, using sewing thread, we attach a piece of polyvinyl chloride tube (cambric) to the cable. The end of the thread can be secured with melted rosin. We make two longitudinal cuts on the cambric and cable insulation.

It should look something like this. The resulting “petals” should be arranged in the form of a cross.

You can then solder the ends of the twisted pairs to the corresponding pins.

We attach the “petals” to the nest body with sewing thread. Secure the end of the thread with rosin.
Now you can improve the nest by putting on a heat-shrink tube or covering it with polyethylene (from a gun).
But, I only had a very rigid cable, so I had to make a more serious fastening.

First, I wound a copper wire with a diameter of 1.3 mm around the edge of the cable. Then I soldered the ends of this wire to the side walls of the USB socket.

To give additional rigidity to the structure, I covered the junction of the cable with the USB socket with low-temperature hot melt adhesive.

To give it a more attractive shape and improve the appearance of the connector, I covered it with heat-shrinkable tubing. IN
Attention! As the tube shrinks, hot melt adhesive may seep through the cracks into the inside of the socket. To prevent this, you can insert a gasket between the tube and the socket body or a plug into the socket. Then you won’t have to pick out the hot-melt glue from the socket.