Restoring your computer to its previous settings. Restore old computer settings
In the last article we looked at how to make a Windows restore point. Now we will learn how to restore the Windows system from this point. If you have not yet read the previous article, I advise you to do so. We all, sooner or later, install some unknown crap on our computer, and at our own peril and risk. Without thinking about the consequences, we install various programs on our PC in order to test their “wonderful” ability to do something incredible (as we are assured before downloading the program).
RESTORING AND RETURNING WINDOWS 8 TO THE ORIGINAL CONDITION
Before the release of the Windows 8 operating system, returning a computer to its original state was neither easy nor quick. But now, with the help of new features, this can be done in minutes. I can’t even believe it, right? However, this is one of the best features of Windows 8.
At work, I have to constantly test various programs, so my computer needs regular maintenance.
WINDOWS 7 SYSTEM RESTORATION
Most often, the function of restoring the computer to a working state is required if some program was installed and after that the system began to slow down. You should also restore the system to an earlier state if the computer was subject to a virus attack. In most cases, the computer is infected or littered with programs so much that the recovery operation can only be performed from safe mode.
SYSTEM RESTORE IN WINDOWS 7
Hello, I have already written an article about how to enable system restore and how to create a restore point. Now is the time to write about how to perform a system restore in Windows 7. To put it simply, now I will write about how to perform a system rollback.
If you have some kind of problem with your computer, for example, it has become very glitchy, or even worse, it won’t start at all, then the first thing you need to do is to try a system rollback, thereby we will return the settings and system files from the backup that was created for example two days ago, when the computer was still working normally.
This is a good opportunity to quickly repair your computer and return it to normal operating condition.
WE DO SYSTEM RESTORATION ON ALL VERSIONS OF WINDOWS ORDER A TECHNICIAN BY TEL
You can return your computer settings to WindowsXP using the “System Restore” item. In order to do this thing on your computer, you need to reboot and, pressing the F8 key, wait until the boot menu appears in which you need to select “Safe Mode”, then confirm the computer is running in this mode and follow the path “Press Start - Select programs - click standard - click service ones - and finally we click on system restore.”
INTEGRATION XXI CENTURY
Many manufacturers of computers, laptops and netbooks install hidden partitions with the installed operating system and factory parameters (settings), programs and drivers to restore Windows in the event of a system crash, constant blue screens of death, user deletion (due to inexperience) of necessary system files, or improper shutdown services, infecting your computer with viruses, installing a new OS, etc.
HOW TO RESTORE WINDOWS 8
To quickly restore Windows 8 using the Reset or Refresh functions. you need a recovery partition on your hard drive. It is usually included in the basic installation. See below for how to check.
If there is no sector, then you will have to use either an installation disk or a recovery disk (disc recovery), or download and create it, or use other functions and methods without a disk.
HOW TO RESTORE YOUR LAPTOP TO FACTORY SETTINGS
Restoring a laptop to factory settings is necessary in many situations. Many problems arise due to Windows crashing or the system being clogged with unnecessary programs.
Almost every laptop (except for completely old models) has a hidden system recovery. Under no circumstances should the folder called “Recovery” be deleted.
It stores important information about your system.
Friends, I have long promised my regular readers to write an article about system recovery. Many of us have already encountered this situation more than once when we install some program, make some operating system settings, accidentally delete service files and do much more, which ultimately leads to incorrect and unstable functioning of the OS.
Today I will tell you? What needs to be done to return the operating system to working condition.
Friends, do not forget that there are no hopeless situations.
The algorithm discussed below will be useful to everyone. There are no people who don’t make mistakes and always do everything right. As wise people say: “Only those who do nothing make no mistakes.” But you should also be able to correct mistakes.
And for everyone who wants to find out and, if necessary, undo the last actions on the computer, I have written a detailed algorithm.
Recovery checkpoint
So, Friends, a recovery checkpoint is a copy of the operating system service files, program settings, as well as the system registry at a certain point in time.
The operating system, as a rule, creates recovery checkpoints automatically at certain intervals, in the case of installing any software or at the direct direction of the user.
It should be noted that when “rolling back” to the operating system restore point, the user’s personal files, such as music tracks, graphic files, documents, etc., are not affected.
Attention! Returning to a restore point allows you to restore the operating system, but not the user's personal content.
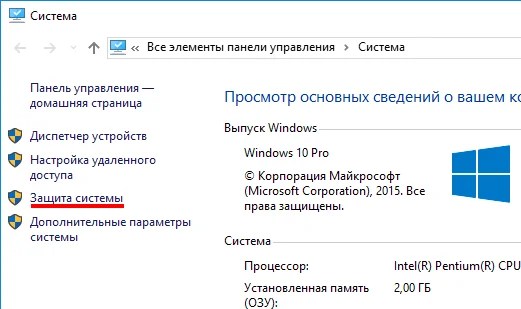
1. Click on the “Start” button at the bottom right of the screen and select “Control Panel”. The main Control Panel window of the Windows 7 operating system will open:

2. Click on the very first section “System and Security” and in the window that opens, select the subsection “Restore the computer to a previous state”.

3. In the window that appears, click on the “Run system recovery” button.

4. The system will collect the necessary information and launch the System Restore Wizard. In the first window that appears, you just need to click the “Next” button.

5. Next, the second Wizard window will open, where you need to select a restore point from the list provided. If you have just made some settings and want to cancel them, then select the topmost entry indicated. You can also select any recovery point entry that suits you.

You can also run “Search for affected programs” by clicking on the corresponding button. The operating system will scan its service records, determine which programs will be deleted or restored during a rollback to a restore point, and present the analysis results in a separate window. After reviewing the lists of affected programs, click the “Close” button.

7. A warning window will appear on the screen that it will be impossible to interrupt the system recovery. And once again they will ask you to confirm your intentions by clicking the “Yes” button.

After this, the system recovery process will begin. Which usually takes a little time - about 2-3 minutes. After which the system will reboot and you will see this window:

Your computer has been restored to the specified state. Now you can check the operation of the OS and other programs to ensure they are working correctly. Be sure to test the result of the system restore.
If the operating system was unable to restore the system, then the window will be different. This often happens when an antivirus program is running. Disable it and try again.

If you were able to successfully solve the “” problem, then I congratulate you. But in some cases, restoring the system did not lead to an improvement in the situation, but rather to its deterioration. The system began to freeze, some programs would not load at all, desktop icons disappeared, etc. In this case, it is best to cancel System Restore.
To do this, we carry out the entire algorithm, starting from point 1. When you complete step 3, the following window will open:

Select “Cancel system restore” and then follow the algorithm presented above.
So, Friends, we looked at a rather important question: “how to restore the system?”, We learned how to “roll back” the system to restore points and cancel “rollbacks”.
It should be noted that it is possible to restore the system using this method, but only if there was no serious damage to system files, for example, as if the system was infected with a virus. In case of serious malfunctions of the OS, this tool is ineffective and you cannot avoid resorting to one of the advanced methods of system recovery.
In one of the following articles, I will talk about just such a tool - an emergency recovery disk.
Due to the presence of viruses, driver or software mismatches, the OS may malfunction. If your Windows crashes, don’t rush to panic. The situation can be corrected by returning the state of files and programs to the moment when the PC was working properly.
While running OS Windows 7, 10 or 8, certain errors and problems may occur. As a result of such failures, starting the operating system again in operating mode becomes impossible. In this case, it is not at all necessary to do a time-consuming reinstallation of the OS. All you need to do is perform a system restore.
Recovering the OS using the recovery environment
When working we use the following scheme of actions:
- Reboot the computer, press the F8 key while loading;
- Troubleshooting;
- System restore, selecting an OS restore point;
- Click "Further" and again "Further";
- Press the button "Ready", we reboot the system (in the Menu, select boot with the last successful configuration).
There are several methods you can use to get your OS running again. Some of them rely on rolling back to saved settings. Others simply clear the data.
You can “reanimate” the OS in one of the following ways:
- by selecting restore points;
- using the command line;
- through safe mode;
- using a recovery environment;
- using an image/boot disk.
Restoring the operating system using system “resuscitation” checkpoints is one of the most affordable, effective and popular options. To apply it, you need to make a series of clicks:
- Panel "Start";
- "System Restore";
- "Further";
- "Select a restore point";
- "Ready".
With such an operation, problems with the computer will be corrected, changes will be canceled and the system will be returned to the operating state that allowed the PC to boot normally. There is no loss of data, files and documents with this type of recovery. All data is saved. The operation is reversible. You can roll back the system to a previous computer state and use a different restore point.
Many people wonder how to make a recovery point on their own (manually) in order to choose it in the future? To do this in the same menu "Start" - "System Restore" You can create such a point yourself at any time convenient and suitable for you. It will be saved indicating the current date, which you just have to remember.
From restore point
In computer engineering there is such a thing as a recovery point. These are saved PC settings. As a rule, saving occurs automatically with each successful OS boot. The easiest way to restore Windows 7 is to use this data.
Press F8 when your computer boots. This command will bring up a menu of system startup options. Next, you need to select the Last Known Good Configuration option.
Another method can be used. Go to the properties of the My Computer folder. Find the line System Protection, clicking on which will open the dialog box of the same name. Click Recovery – Next. We set a target date, indicate the disks that need to be fixed, and confirm the actions. After rebooting, the PC should work normally.
No restore points
You can fix problems with the OS even without restore points. To do this you will need to resort to the LiveCD program. You need to download it and burn it to a flash drive with the .iso extension.
Further all actions will take place in the BIOS. You need to configure booting from a flash drive. To do this, in the Boot section, select USB-HDD in the First boot device line.
Before proceeding directly with the recovery, copy all the necessary files to a removable disk. The LiveCD program provides a special menu for these purposes.
We will fix the system error using an archived copy. Connect the USB flash drive, open the Windows\System32\config\ folder. Files with the names default, sam, security, software, system must be moved to any other folder. In their place, transfer similar files from the RegBack folder and restart the computer.

The described method will only help if the problem is related to the registry.
Command line
You can resort to “reanimating” Windows 7 from the command line if the PC begins to freeze or works slowly, however, the system still boots. Enter the menu "Start" and using the right mouse button, launch the command prompt as administrator. Run the rstrui.exe command, which will open the system restore program. Click "Further". In the next window, select the desired rollback point and click again "Further". Once the process is complete, the PC should work normally.
There is another way to access the utility. Let's go to "Start". To open the command line, click "Run" and enter the CMD command. We click on the found CMD.exe file and wait for it to launch. Next, enter rstrui.exe in the command line and confirm the action with the Enter key on the keyboard.
It is not always possible to play it safe and create OS restore points in advance. Problems may arise that block the option of such “reanimation” of the PC. Then you can use another, no less effective and easy option - restoring the Windows system using the system itself.
We rely on the diagram:
- Icon "My computer"- right mouse button "Properties";
- "System protection";
- In the new window click "System protection", recovery button;
- "Further";
- Select a restore point according to the date;
- Specify the system disks to be restored;
- We confirm the operations and reboot the system.
Restoring Windows 7 using Safe Mode
This method is preferred if the usual system boot is impossible. Then after pressing the PC power button on the system unit, hold down the F8 key to call "Start Menu". One of the "Menu" options is "Safe mode". Select it and press Enter on the keyboard. As soon as Windows boots, we carry out the algorithm of actions that we described earlier.

System recovery Windows 8/8.1
If you managed to start the OS, you can resume Windows 8 via "Options". Hover over the top right corner and enter them. Click on "Change computer settings" – . Chapter "Recovery" will offer several options:
- "Regular recovery with information preservation".
- “Deleting data and reinstalling the OS”.
- "Special option".
Decide what exactly needs to be done. Next, follow the menu prompts.
If you choose the latter method, in the window that opens, click on the diagnostics item. You will be offered the following options:
- "Restore";
- "Return to original state";
- "Extra options". This item includes the ability to roll back to the desired resume point.

To resume Windows 8.1, press Win+R and call sysdm.cpl. In the system properties window in the tab "Protection" specify the required system drive. Click "Restore". Clicking "Further", you will be able to see a list of rollback points. Select the one you want and click "Search for affected programs". Changes that have been made to the PC since the selected moment will be deleted. Complete the process by clicking "Ready".
If you work with Windows 8, problems may occur, the Internet may not work correctly, etc. To fix this, you can use the classic recovery method through restore points.
Another option is a system rollback. To do this, open the menu "Start" - "Control Panel" - "Windows Update". Select an item "Removing updates". The same can be done using the command line.
So, in the list of updates that opens, we delete those from the moment of installation of which (we look by date) problems and malfunctions began. We delete unnecessary files and reboot.
You can perform a factory reset on Windows 8.1. Important files will not be affected during this operation. The method is effective, but to implement it, the OS needs to boot without problems. We use the algorithm:
- Right side of the monitor - "Options";
- "Change settings";
- "Update and Recovery" - "Recovery";
- "Recovery without deleting files".
If you cannot log into the system in the usual way, you must use the disk with the system. Load the installation disk, select "System Restore". Press the button "Diagnostics", And "Restore".
If you have problems with Windows 10, press Windows + Pause. Go to "System protection" and press "Restore" – "Further". Select the desired indicator and click again "Further". When finished, click "Ready". The computer will automatically restart and the changes will take effect.
One of the advantages of the “ten” is the ability to return the settings to factory settings. This helps avoid having to install the system all over again. To reset your data go to "Computer Settings" – "Update and Security" – "Recovery" – "Return the computer to its original state". Click "Begin".
You can take care of the possibility of a rollback in case of failure in advance. You can create resume points yourself or configure their automatic creation at the desired frequency. To do this, in the settings, in the Update and security item, select Backup service. Specify where to save copies, click Add disk. After selecting the device, the function will be activated.
You can restore your Windows 10 system again by using restore points. In this case, the system will be rolled back to the moment when it loaded smoothly and worked without failures. This recovery method is described at the beginning of the article.
If the OS does not boot, a warning table with a key appears on the screen "Additional recovery options". Click it and select "Diagnostics" - "System Restore". We select a Windows restore point, wait for the system to roll back and reboot.
If such operations do not help and the computer continues to work incorrectly, you can roll back to the basic settings. Some programs and utilities, personal PC settings will be reset, and personal data will be deleted.
This technique is used extremely rarely if the other options described above do not help. The algorithm of actions is as follows:
- "Start" - "Selecting parameters"- tab "Updates and Security";
- Paragraph "Recovery"- button "Begin";
- We choose to delete all files or keep some of them.
Recovering the system after this will take 40-90 minutes.
Resuming using the installation disc
One of the radical methods of fixing the error involves using an installation disk. After launching it in BIOS, click System Restore. In the Troubleshooting section, specify the desired action. Next, follow the system prompts to complete the process.
, "Roll back Windows 10 to a previous state and set up restore points
Roll back Windows 10 to a previous state and set up restore points
There are situations when the computer does not work as we would like it to, and at the same time we know exactly what happened after we installed some programs on it. Then in this case, most likely, you will be helped by rolling back Windows to a previous restore point.
This can be done by right-clicking on the shortcut with “My computer", select “ Properties", and then in the left column go to the line "". Another way is to go to " Start - Settings", enter the word " dot" and select the line " Creating a restore point».
Whatever method you choose, the result will be the opening of this window:
We need a button Restore…", as you might have guessed. Clicking on it will launch “”.

In the second step, we need to specify the restore point to which we want to return. Moreover, the description will indicate before what actions it was created.

What’s important is that when you restore data, your documents that you worked with will not be affected. So in terms of this share you can be calm. Well, then there’s nothing complicated, all you have to do is agree with the program and press “ Further».
Settings for creating recovery points
I wrote this section with a reserve for the future. If you go back to the first screenshot and click the " Tune…", then we will get into the settings mode:

Here you can either enable or disable the recovery system (not recommended). But most importantly, here we can configure the hard drive space limit, thereby allowing the system to record a larger number of recovery points. It’s clear that the more space we set, the more recovery points the system will eventually be able to create. And if so, then the more choice we will eventually have.
This option will help return the system to the state recorded at a certain point in time - the restore point. If saving such points is configured and enabled, then the system state will be recorded to the hard drive before installing updates, drivers and applications.
Returning Windows to a restore point will save all personal files, but drivers and applications that appeared after the point was created will need to be reinstalled.
To start Windows Recovery, right-click on Start (Win + X) and go to Control Panel → System and Security → System → System Protection. Click "Restore" → "Next" and select the desired restore point.
Another path option: “Control Panel” → “All Control Panel Items” → “Recovery” → “Run System Restore”.
If the restore point is not found, it means that system protection is disabled, and you will have to use other methods.
To avoid troubles in the future, enable the creation of restore points. To do this, in the same “System Protection” menu, select the system drive, click “Configure” and enable system drive protection.
2. Return the computer to its original state
If there are no restore points or going to them does not help, try returning the system to its original state. You can roll back while saving the files or completely delete everything and . Also, some computers - often laptops - have an option to restore factory settings.

In Windows 8 and 10, you can start restoring to its original state by going to Settings → Update and Security → Reset your PC → Get Started.
In Windows 7, to do this, go to “Control Panel” → “System and Security” → “Backup and Restore” → “Restore system settings or computer” → “Advanced recovery methods” → “Return the computer to the factory-set state.”
3. Restore Windows using a disk
A recovery disk is useful, for example, for rolling back to a saved point or returning to its original state if Windows fails. An ordinary flash drive, external hard drive or DVD can serve as such a disk.

The recovery disc should be written in advance and stored in case of system failure. Under Control Panel → All Control Panel Items → Recovery, click Create a recovery disk. In the menu that appears, check the “Back up system files to a recovery disk” option, and you can use the USB drive not only to fix errors and rollback, but also to reinstall Windows.
You can create a recovery DVD in Windows under “Control Panel” → “System and Security” → “Backup and Restore” → “Create a system recovery disc.” The same method works in newer versions of the system, only the name is different: “Backup and Restore (Windows 7)” instead of “Backup and Restore”.

To correct errors, boot the system from disk. In the recovery environment that opens, click Troubleshoot. Start returning to a system restore point in the “Advanced options” → “System Restore” menu.
4. Restore Windows using a full system image
Another option for restoring Windows is to roll back to a previously created system image. The image is written to a hard drive, DVD, or network share.
Unlike a rollback or point-to-point restore, using a full image preserves all files, applications, settings, and drivers installed at the time it was created.

The most appropriate moment to create such an image may be when all the necessary applications are installed on the system, but there is nothing superfluous. This way you can continue working immediately after recovery.
To create a full system image, in the Control Panel, select Backup and Restore (Windows 7) → Create a system image. (In Windows 7: Control Panel → System and Security → Backup and Restore → Create a system image.)
In the menu that appears, you can choose which of the existing partitions and files to include in the system image and on what media to burn it.

With a complete system image at your disposal, you can quickly return Windows to the state you want. You can start image-based recovery when you restart the computer: “Diagnostics” → “Advanced options” → “System image recovery”.